Security
Data access policies
Orbital supports defining data access policies against types, which are evaluated when running queries. This feature allows you to define data policies once and enforce them consistently across your organization, regardless of where data is served from.
Overview
Policies are a first-class citizen within Orbital and are defined in your Orbital project along with your types, models, and services. They can conditionally control the data that’s returned (including filtering and obfuscating values) and determine which services and operations can be invoked.
Getting Started - Configuring your JWT
Policies are often used as a form of authorization based on the user requesting the data. To use policies in this manner, you must first have configured Authentication with Orbital.
Exposing User Information
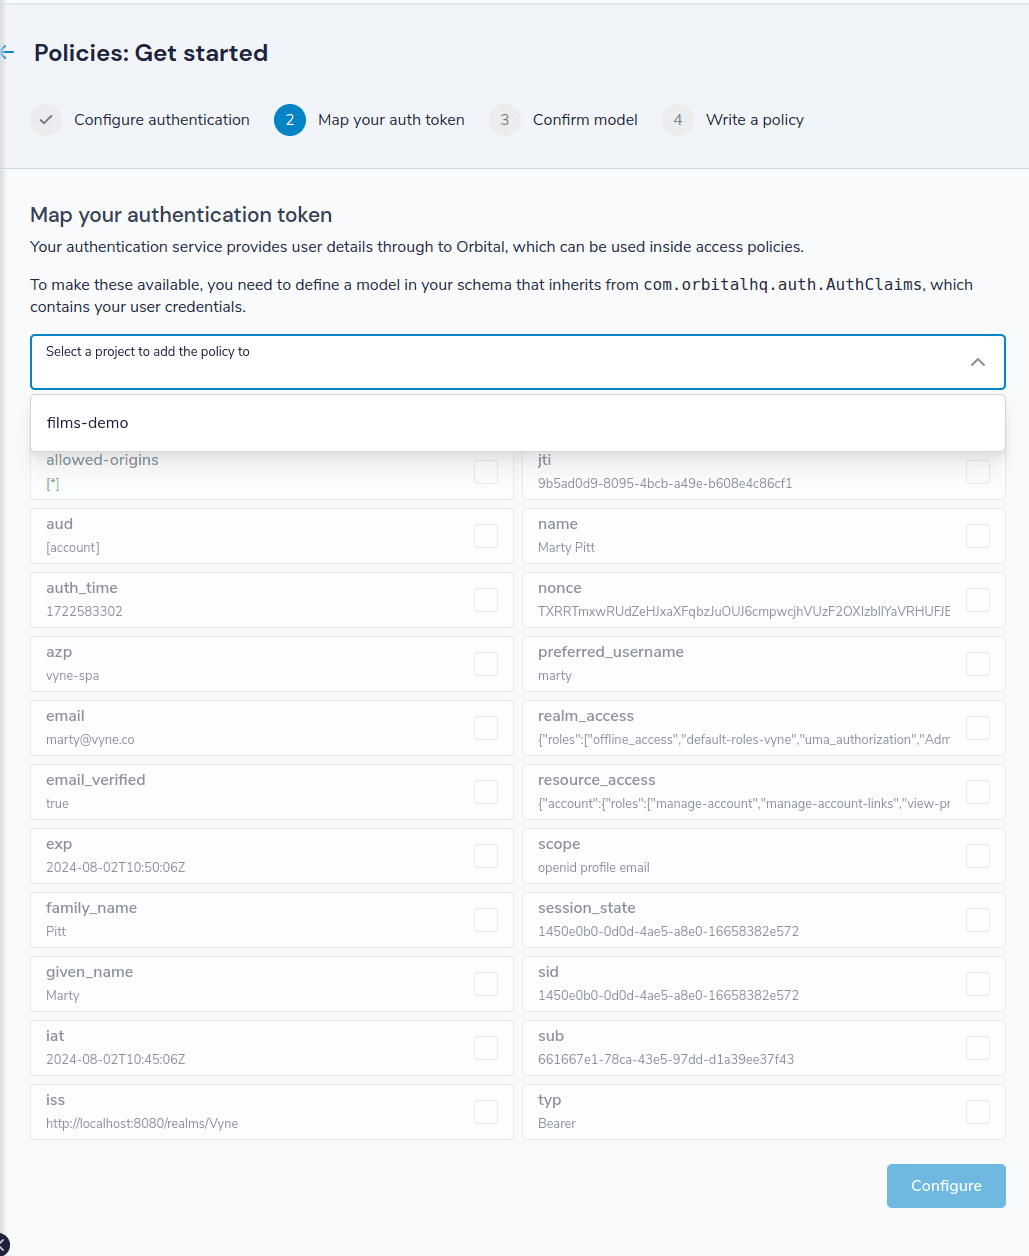
Policies access user information from the claims presented on your authentication token. Since each authentication provider is different, you need to define an Orbital type that maps data from your token into data types you can use in your policies.
Orbital’s UI will guide you through this process and create the corresponding types for you:

Alternatively, you can manually define a model that extends from com.orbitalhq.auth.AuthClaims. You don’t need to map everything from the token, only the attributes you care about.
For example, consider the following JWT:
{
  "sub": "661667e1-78ca-43e5-97dd-d1a39ee37f43",
  "email_verified": true,
  "allowed-origins": ["*"],
  "iss": "http://xxxx",
  "typ": "Bearer",
  "preferred_username": "jimmy",
  "realm_access": {
    "roles": [
      "offline_access",
      "default-roles-vyne",
      "uma_authorization",
      "Admin"
    ]
  },
  "email": "marty@vyne.co"
}
You can cherry-pick the useful fields and define a model. Note that the model name isn’t important, but it must inherit from com.orbitalhq.auth.AuthClaims:
type Sub inherits String
type Role inherits String

model UserInfo inherits com.orbitalhq.auth.AuthClaims {
   sub : Sub
   realm_access : {
      roles: Role[]
   }
}Verifying Your Credentials
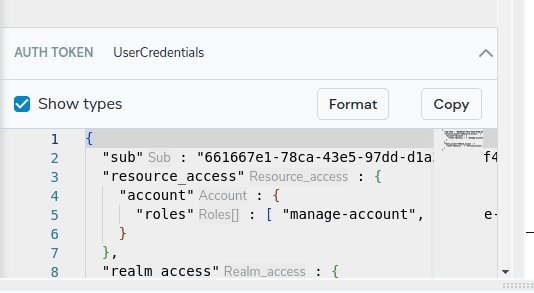
To verify that your credentials have been mapped correctly, the UI will show the details of the current user in the policy designer:

Defining Policies
Policies are defined in Taxi files within an Orbital project. Here’s a simple example:
model Film {
   title : Title inherits String
   yearReleased : YearReleased inherits Int
}

// Define a policy named `ExcludeYearReleased` which will operate against the `Film` type.
policy ExcludeYearReleased against Film {
   read { // define the scope - either read or write
     Film as { // return the Film type
      ... except { yearReleased } // but exclude some fields
     }
   }
}
The above policy will be invoked whenever data is returned from an operation that returns Film data.
Inputs to policies
Policies can request data as an input, which can be referred to within the policy. For example, this policy requests information about the user making the request:
policy FilterSalary against Employee (userInfo : UserInfo) -> {
  ...
}
Here, UserInfo is the type configured against the JWT token as described earlier.
You can request any data in the policy, including data loaded from additional services, as described below.
Suppressing data based on user properties
You can create policies that behave differently based on user properties.
For example, this policy suppresses the salary field from
policy FilterSalary against Employee (userInfo : UserInfo) -> {
   read {
      when {
         userInfo.groups.contains('ADMIN') -> Employee
         else -> Employee as { ... except { salary } }
      }
   }
}Policies may not alter structure
Data policies can be used to obfuscate and filter out properties, but they cannot drop fields entirely, as doing so would cause parsing exceptions in downstream systems, and mean that responses violate their own contracts.
When data is filtered (for example, using a spread operator), the resulting object contains nulls.
Policies and expressions
When models include an expression, the expression is evaluated using the input values after the relevant security policies have been applied.
This approach ensures that sensitive information is not inadvertently exposed (for example, by adjusting a policy-protected value using an expression such as: EmployeeSalary + 1).
As a result, the input values used in the expression may differ from the original values returned by an operation.
If a policy causes an input value to become null, the expression will also evaluate to null.
Throwing Errors from Policies
Policies can also throw errors to completely deny access to certain data based on conditions. For example:
policy OnlyManagers against EmployeeInfo (userInfo : UserInfo) -> {
   read {
      when {
         userInfo.groups.contains('Manager') -> EmployeeInfo
         else -> throw((NotAuthorizedError) { message: 'Not Authorized' })
      }
   }
}Obfuscating data
You can use policies to obfuscate the Policies can be applied to nested types as well. For example, to partially obfuscate titles for non-admin users:
policy FilterFilmTitle against Title (userInfo : UserInfo) -> {
   read {
      when {
         userInfo.groups.contains('ADMIN') -> Title
         else -> concat(left(Title, 3), "***")
      }
   }
}Using External Data in Policy Decisions
Policies can load additional data from external services to make decisions. For example, to filter films based on whether the user has accepted terms and conditions:
model UserConsent {
   acceptedTermsAndConditions : AcceptedTermsAndConditions inherits Boolean
}

service UserService {
   operation getConsent(UserId): UserConsent
}

policy AllAccessFilms against Film (userInfo : UserInfo, acceptedTerms: AcceptedTermsAndConditions) -> {
   read {
      when {
         acceptedTerms == false -> null
         else -> Film
      }
   }
}Projection and Policy Impact
When a policy modifies a field that is used in a projection, the result is affected accordingly. For instance, if a policy suppresses the title field for non-admin users:
policy FilterYearReleased against Film (userInfo : UserInfo) -> {
   read {
      when {
         userInfo.groups.contains('ADMIN') -> Film
         else -> Film as { ... except { title } }
      }
   }
}
Querying and projecting the title field for a non-admin user would result in:
find { Film } as {
   name : Title
}
For non-admin users, this would return name: null.
Understanding When Policies Are Applied
Policies defined against types or models are applied to data returned from a service before it’s made available in Orbital (either for other service calls or to return to a caller). A policy is applied to the type and all its subtypes.
Try it out
Using Errors in Policies
Errors can be thrown in policies to prevent access entirely, returning an error code to the user. For example:
policy OnlyManagers against EmployeeInfo (userInfo : UserInfo) -> {
   read {
      when {
         userInfo.groups.contains('Manager') -> EmployeeInfo
         else -> throw((NotAuthorizedError) { message: 'Not Authorized' })
      }
   }
}
Read more about throwing errors.
Streaming queries
Data policies can also be applied to streaming queries, which are running continuously in the background.
Instead of executing with the requesting users permissions (as request / response queries do), persistent streaming queries execute with a system account - the Executor user.
Configuring the Executor user
The Executor User is a standard system account defined by your Identity Provider (IDP). Assign roles as you would with any other user, as discussed in our docs on Authentication.
Orbital authenticates this role using the OAuth2 Client Credentials flow with a client-id and client-secret. Pass these
to the Orbital instance at startup with the following configuration settings:
| Parameter | Description | Mandatory |
|---|---|---|
vyne.security.openIdp.executorRoleClientId | The user to authenticate with. Note - this can be different from the standard authentication client configured with clientId | Yes |
vyne.security.openIdp.executorRoleClientSecret | The Client Secret to authenticate with | Yes |
vyne.security.openIdp.issuerUrl | The URL of the IDP. Note that Orbital’s server will connect to this URL, so ensure it’s accessible from the server | No (see Configuration Notes) |
vyne.security.openIdp.executorRoleTokenUrl | The URL of the IDP to fetch the access token by supplying executorRoleClientId and executorRoleClientSecret | No (see Configuration Notes) |
vyne.security.openIdp.executorRoleAuthenticationType | Client Authentication Type. Possible Values are ClientSecretPost or ClientSecretBasic | Default Value is ClientSecretPost |
vyne.security.openIdp.executorRoleScopes | Scopes that need to be passed to access token request. | No (see Configuration Notes) |
Configuration Notes
- The Configured
clienton theOpenIDserver must support eitherclient_secret_postorclient_secret_basicfortoken_endpoint_auth_method(see Client Metadata). By default, Orbital will useclient_secret_postauthentication method. However, you can get Orbital to useclient_secret_basicvia:
--vyne.security.openIdp.executorRoleAuthenticationType=ClientSecretBasic
vyne.security.openIdp.executorRoleTokenUrl corresponds to the token_endpoint value in OpenID Provider Configuration Response.
When it is provided, Orbital will send the following post request to it to fetch the access token for the executor user
curl --location '<vyne.security.openIdp.executorRoleTokenUrl>' \
--header 'Content-Type: application/x-www-form-urlencoded' \
--data-urlencode 'grant_type=client_credentials' \
--data-urlencode 'client_id=<vyne.security.openIdp.executorRoleClientId>' \
--data-urlencode 'client_secret=<vyne.security.openIdp.executorRoleClientSecret>'
When vyne.security.openIdp.executorRoleTokenUrl is not provided, Orbital will use vyne.security.openIdp.issuerUrl to fetch the Obtaining OpenID Provider Configuration Information and then
use token_endpoint element value from the response to issue the request for the access token.
Example configurations:
- Obtain Executor access token with
client_secret_post:
--vyne.security.openIdp.executorRoleClientId=TheSchuylerSisters
--vyne.security.openIdp.executorRoleClientSecret=AngelicaElizaAndPeggy
--vyne.security.openIdp.executorRoleTokenUrl=http://localhost:9000/oauth2/token
Above settings will result in the following request sent from Orbital to OpenID server:
curl --location 'http://localhost:9000/oauth2/token' \
--header 'Content-Type: application/x-www-form-urlencoded' \
--data-urlencode 'grant_type=client_credentials' \
--data-urlencode 'client_id=TheSchuylerSisters' \
--data-urlencode 'client_secret=AngelicaElizaAndPeggy'- Obtain Executor access token with
client_secret_basic:
--vyne.security.openIdp.executorRoleClientId=TheSchuylerSisters
--vyne.security.openIdp.executorRoleClientSecret=AngelicaElizaAndPeggy
--vyne.security.openIdp.executorRoleTokenUrl=http://localhost:9000/oauth2/token
--vyne.security.openIdp.executorRoleAuthenticationType=ClientSecretBasic
Above settings will result in the following request sent from Orbital to OpenID server:
curl --location 'http://localhost:9000/oauth2/token' \
--header 'Content-Type: application/x-www-form-urlencoded' \
--header 'Authorization: Basic VGhlU2NodXlsZXJTaXN0ZXJzOkFuZ2VsaWNhRWxpemFBbmRQZWdneQ==' \
--data-urlencode 'grant_type=client_credentials' - Obtain Executor access token with
client_secret_basicand setscopeas part of the request:
--vyne.security.openIdp.executorRoleClientId=TheSchuylerSisters
--vyne.security.openIdp.executorRoleClientSecret=AngelicaElizaAndPeggy
--vyne.security.openIdp.executorRoleTokenUrl=http://localhost:9000/oauth2/token
--vyne.security.openIdp.executorRoleAuthenticationType=ClientSecretBasic
--vyne.security.openIdp.executorRoleScopes=scope1 scope2 scope3
Above settings will result in the following request sent from Orbital to OpenID server:
curl --location 'http://localhost:9000/oauth2/token' \
--header 'Content-Type: application/x-www-form-urlencoded' \
--header 'Authorization: Basic VGhlU2NodXlsZXJTaXN0ZXJzOkFuZ2VsaWNhRWxpemFBbmRQZWdneQ==' \
--data-urlencode 'grant_type=client_credentials' \
--data-urlencode 'scope=scope1 scope2 scope3'Troubleshooting
IssuerUrl connectivity issues
The issuerUrl setting is used by both standard Authentication (to authenticate users logging in to Orbital), as
well as by Orbital to fetch user credentials for the Executor user.
- User authentication will perform a browser-side redirect to the IssuerUrl - so the URL must be accessible from your browser.
- Executor User authentication performs requests from Orbital’s server - so the URL must be accessible from your server.
Normally, this is not a problem. However, if you’re running everything locally (eg., using Docker or Docker Compose) you may need to use host.docker.internal as the issuerUrl DNS name,
(docker docs) or set Docker to use the Host Network.
This is generally not an issue in production (and the above workarounds are not suitable for production), as the network is normally more well defined.
Observers vs Executors
Persistent Streams are always executed under the permissions of the Executor User. However, these streams can also be observed by other users, through published http or websocket endpoint.
In this scenario, policies are applied twice:
- First, the stream is executed using the permissions of the Executor user
- Then, when being observed, the results of the stream are then re-evaluated using the permissions of the user observing the stream
As a result, the observed output may differ from the actual data being emitted by the stream.