Security
Enabling authentication
Overview
Orbital supports authentication through:
- An OpenID Connect authentication service, via the Authorization Flow with PKCE pattern.
OR
- SAML Identity Provider which performs authentication and passes the user’s identity and authorization level to the service provider
OpenID Connect Setup
To enable OpenId Connect Authentication, pass the following config options to Orbital on the command line:
| Parameter | Sample values | Description |
|---|---|---|
vyne.security.openIdp.enabled | true / false (default) | Set to true to enable OpenId Connect Authentication. |
vyne.security.openIdp.issuerUrl | https://auth-service/auth/realms/orbital | The openIdp issuer endpoint. The browser will redirect to this endpoint, so ensure the DNS entry is accessible via browser traffic |
vyne.security.openIdp.clientId | orbital | The client id to present to OpenID server. Defaults to orbital if not provided. |
vyne.security.openIdp.jwks-uri | https://auth-service/certs | A url to load the set of JWK’s used to verify signatures of presented tokens. This url is called by Orbital’s server, so ensure that the DNS entry is accessible to Orbital |
vyne.security.openIdp.require-https | true (default) / false | Indicates if auth must be performed over https. Defaults to true |
vyne.security.openIdp.account-management-url | https://auth-service/account | Optional. A url where authenticated users may be redirected, to manage their account |
vyne.security.openIdp.org-management-url | https://auth-service/org | Optional. A url where authenticated users may be redirected, to manage their organisation. Generally, this is where roles are assigned to users. |
A typical docker config might look as follows:
  vyne:
    image: orbitalhq/orbital:${ORBITAL_VERSION}
    volumes:
      - ./vyne-config:/opt/service/config
    environment:
      OPTIONS: >-
        --vyne.security.openIdp.enabled=true
        --vyne.security.openIdp.jwks-uri=http://keycloak-server/realms/orbital/protocol/openid-connect/certs
        --vyne.security.openIdp.issuerUrl=http://keycloak-server/realms/orbital
        --vyne.security.openIdp.clientId=orbital
When a user attempts to access Orbital, they will be redirected to the login page as configured with the OpenId connect provider.
Orbital doesn’t provide a UI for managing users or roles, it’s expected this is handled through the OIDC service.
The presented JWT
The presented JWT is expected to have the following attributes:
| Claim | Required | Description |
|---|---|---|
sub | required | Subject - Identifier for the End-User at the Issuer. |
iss | required | Issuer - the OIDC provider who authenticated the user |
One of preferred_username or first_name and last_name | required | Shorthand name by which the End-User wishes to be referred to at the RP, such as janedoe or j.doe. |
One of email or clientId | required | Something that uniquely identifies the user |
One of picture or picture_url | optional | The users avatar |
name | optional | End-User’s full name in displayable form including all name parts, possibly including titles and suffixes, ordered according to the End-User’s locale and preferences. |
Additionally, role information must be present. See the docs on Authorization for more information.
Configuring OpenID Providers
Keycloak
Keycloak is the default IDP (it’s what the Orbital team tests with), so requires the least configuration.
# Set to true to enable Auth
--vyne.security.openIdp.enabled=true
--vyne.security.openIdp.clientId=orbital

# The url that the browser will redirect to for authentication.
# Ensure this is accessible from browsers
--vyne.security.openIdp.issuerUrl=http://keycloak-server/realms/orbital

# The url that Orbital will connect to, to validate the JWT's presented.
# Ensure this is accessible from the Orbital server
# This normally follows the convention of ${issuerUrl}/protocol/openid-connect/certs
--vyne.security.openIdp.jwks-uri=http://keycloak-server/realms/orbital/protocol/openid-connect/certsAWS Cognito
The following instructions step through configuring AWS Cognito using AWS Console. These docs aren’t intended to be exhaustive around AWS Congito - refer to AWS for more detailed instructions.
Preparing AWS Congito
- Create an AWS Cognito User pool, and users (if not already present)
- Take note of the User Pool Id.
- Create an App Integration, and click to create an App Client:
- Under App Client:
- Create a Public Client
- Don’t generate a client secret
- Under “Authentication Flows”, ensure that the ALLOW_USER_PASSWORD_AUTH flow is selected
- Under Hosted UI Settings:
- Specify the callback URL of where you’re running Orbital. (For testing, you can additionally add
localhosthere too) - For OAuth 2.0 Grant types, ensure “Authorization code grant” is selected
- For OIDC Connect scopes, ensure
email,openidandprofileare selected
- Specify the callback URL of where you’re running Orbital. (For testing, you can additionally add
- Click Create app client
- Under App Client:
- Take note of the Client Id, which you’ll need in the next step
Configuring Orbital
Use the following config settings in Orbital:
# Set to true to enable Auth
--vyne.security.openIdp.enabled=true
# Replace YOUR_CLIENT_ID with the clientId noted earlier
--vyne.security.openIdp.clientId=YOUR_CLIENT_ID

# In the below, replace REGION and USER_POOL_ID accordingly
# Eg: https://cognito-idp.eu-west-2.amazonaws.com/eu-west-2_xxxxx
--vyne.security.openIdp.issuerUrl=https://cognito-idp.REGION.amazonaws.com/USER_POOL_ID
--vyne.security.openIdp.jwks-uri=https://cognito-idp.REGION.amazonaws.com/USER_POOL_ID/.well-known/jwks.json
# Use the scopes openid email profile
--vyne.security.openIdp.scope="openid email profile"
# Must be set to Id
--vyne.security.openIdp.identity-token-kind=Id
Don't forget!
Azure
Azure AD B2C Not Supported
However, Azure Active Directory (Entra) is supported, as described below.
- Log into Azure, and ensure you have an Azure AD directory active (not an Azure AD B2C directory)
- Navigate to Microsoft Entra ID, and select “App registrations” from the left navbar
- Click “New Registration” in the top navbar
- Provide a name for the application - eg: “Orbital”
- For the Redirect URI, select Single-Page Application, and paste the URL of where Orbital is hosted. (eg:
https://mycompany/orbital) - Click Register
You are taken to the settings for your newly created Azure AD application
- Click “Overview” in the left Navbar.
- Take note of the Application (client) ID - you’ll need this shortly
- From the top navbar, select “Endpoints”
- Take note of the OpenID Connect metadata document value - you’ll need this shortly.
- It should look like this:
https://login.microsoftonline.com/YOUR-APP-ID/v2.0/.well-known/openid-configuration
Don't forget!
Launch Orbital passing the following parameters:
--vyne.security.openIdp.enabled=true

## Use the URL copied above
--vyne.security.openIdp.oidcDiscoveryUrl=https://login.microsoftonline.com/YOUR-APP-ID/v2.0/.well-known/openid-configuration
## Use the ClientId copied above
--vyne.security.openIdp.clientId=xxxxx
--vyne.security.openIdp.scope="openid profile email"
--vyne.security.openIdp.identity-token-kind=Id
## These relate to RBAC, after following the docs for enabling RBAC with Azure
--vyne.security.open-idp.roles.format=path
--vyne.security.open-idp.roles.path=rolesOther IDP's
In general, Orbital supports OpenID Connect authentication and authorization, and should be compatible with most platforms that implement OIDC protocol. Orbital uses the Authorization Code + PKCE flow.
The following parameters (passed to Orbital on startup) are used to configure OpenID Connect support:
| Parameter | Description |
|---|---|
vyne.security.openIdp.enabled | Set to true to turn on support for OIDC |
vyne.security.openIdp.client-id | The ClientId as set by the OIDC provider. |
vyne.security.openIdp.issuer-url | Sets the issuerUrl, as provided by the OIDC provider. |
vyne.security.openIdp.oidc-discovery-url | Sets where the OpenID discovery document is loaded from. If not provided, will default to ${issuerUrl}/.well-known/openid-configuration, which is the convential url, and normally ok. |
vyne.security.openIdp.scope | Optional The OIDC scopes to be requested. Defaults to openid profile email offline_access. Changing this will affect the claims presented in the JWT, which may affect Oribtal’s ability to read the token |
vyne.security.openIdp.require-https | Optional Defines if requests must be made over https. Defaults to true |
vyne.security.openIdp.identity-token-kind | Optional Either Access (default) or Id. Defines which token the browser should present to Orbital after authentication by the IDP. The token should contain the required claims |
vyne.security.openIdp.account-management-url | Optional Provides a url that is presented to the user within the UI to manage their account |
For most scenarios, you need to set either the issuer-url or oidc-discovery-url, but not both. However, if your OIDC provider uses non-standard configuration, both may be required.
Troubleshooting OpenID
Ensure DNS entries are accessible
When testing with Docker / k8s, it’s common to be accessing the browser via localhost, but services are operating in a different, isolated DNS networks. Pay particular attention to the two following settings, which are accessed in different contexts:
| Parameter | Description |
|---|---|
vyne.security.openIdp.issuerUrl | Redirected from the browser. If you’re running keycloak (or similar), localhost is possibly ok here. |
vyne.security.openIdp.jwks-uri | Requested from the Orbital server. If both Orbital and your IDP (eg Keycloak) are running within Docker, make sure you use a DNS entry that is accessible to Orbital. (ie., localhost is unlikely to work here) |
SAML Authentication
SAML stands for Security Assertion Markup Language. It is an XML-based open-standard for transferring identity data between two parties: an identity provider (IdP) and a service provider (SP).
Identity Provider — Performs authentication and passes the user’s identity and authorization level to the service provider.
Service Provider — Trusts the identity provider and authorizes the given user to access the requested resource.
To configure Orbital as a Service Provider and authenticate users against a SAML Identiy Provider, pass the following config options to Orbital on the command line:
| Parameter | Sample values | Description |
|---|---|---|
vyne.security.saml.enabled | true / false (default) | Set to true to enable SAML Authentication. |
vyne.security.saml.keyStorePath | /opt/service/orbital/saml.jks | SAML protocol requires signing various SAML protocol messages. This is the full path of corresponding key store accessible by Orbital. Please note that, If the key store file does not exists at the specified location, Orbital will create the key store for you. |
vyne.security.saml.keyStorePassword | orbital | Password for your key store |
vyne.security.saml.privateKeyPassword | orbital | Password for your private key contained in the key store. |
vyne.security.saml.idpMetadataFilePath | /opt/service/orbital/saml-idp-metadata.xml | Full path of your SAML Idp metadata xml. The path should be accessible by Orbital. |
vyne.security.saml.serviceProviderEntityId | http://foo.orbitalhq.io | Service Provider Entity Id of the Orbital. |
vyne.security.saml.callbackBaseUrl | http://foo.orbitalhq.io | Orbital URL which is accessible by SAML Idp. |
vyne.security.saml.serviceProviderMetadataResourcePath | /opt/service/orbita/sp-metadata.xml | Full path of the service provider metadata xml file, This file will be generated automatically by the Orbital! |
vyne.security.saml.maximumAuthenticationLifetime | 3600 | Once you have an authenticated web session on the Identity Provider, usually it won’t prompt you again to enter your credentials and it will automatically generate a new assertion for you. By default, the SAML client will accept assertions based on a previous authentication for one hour. If you want to change this behavior, set the maximumAuthenticationLifetime parameter. |
Example SAML Setup with Okta
- To begin, you’ll need an Okta developer account. You can create one at developer.okta.com/signup or install the Okta CLI and run okta register.
- Log in to your Okta account and go to
Applications > Create App Integration.SelectSAML 2.0and click Next. Name your app something like OrbitalSaml and clickNext - Assuming the Orbital will be running on your local with its default port. Set the
Single sign-on URLas
http://localhost:9022/saml?client_name=SAML2Client
Use
Single sign-on UrlforRecipient URLandDestination URL.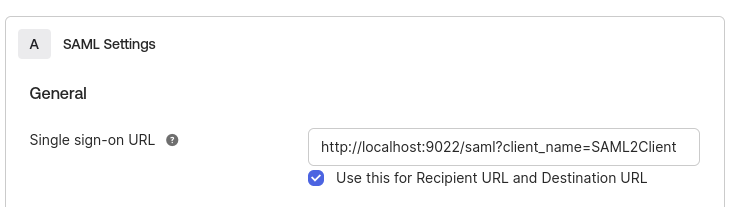
Set
Audience URI (SP Entity ID)tohttp://okta-sample.orbital.io
Click on
NextSet
App typetoThis is an internal app that we have createdOkta will create your app, and you will be redirected to its Sign On tab. Scroll down to the SAML Signing Certificates and go to SHA-2 > Actions > View IdP Metadata. You can right-click and copy this menu item’s link or open its URL. Copy the resulting link to your clipboard. It should look something like the following:
Save the View Idp Data to a patch that is accessible to Orbital, you’ll set the value of
vyne.security.saml.idpMetadataFilePathconfiguration value.Go to your app’s Assignment tab and assign access to the Everyone group.
Here is the list of orbital arguments for your setup:
--vyne.security.saml.enabled=true
--vyne.security.saml.keyStorePath=/opt/serviuce/orbital/saml.jks
--vyne.security.saml.keyStorePassword=orbital
--vyne.security.saml.privateKeyPassword=orbital
--vyne.security.saml.idpMetadataFilePath=/op/service/orbital/okta-idp-metadata.xml
--vyne.security.saml.serviceProviderEntityId=http://okta-sample.orbital.io
--vyne.security.saml.callbackBaseUrl=http://localhost:9022
--vyne.security.saml.serviceProviderMetadataResourcePath=/opt/service/orbital/sp-orbital-metadata.xml