Guides
First Integration
Overview
In this tutorial, we’ll set up a local instance of Orbital, and then see how to use Orbital to link data from a REST API, a database, and a Kafka topic.
This is a step-by-step introduction for beginners.
This guide walks you through the basics of linking data sources together using Orbital’s UI.
Our use-case is to find a list of films, along with which online streaming service has the films available to watch.
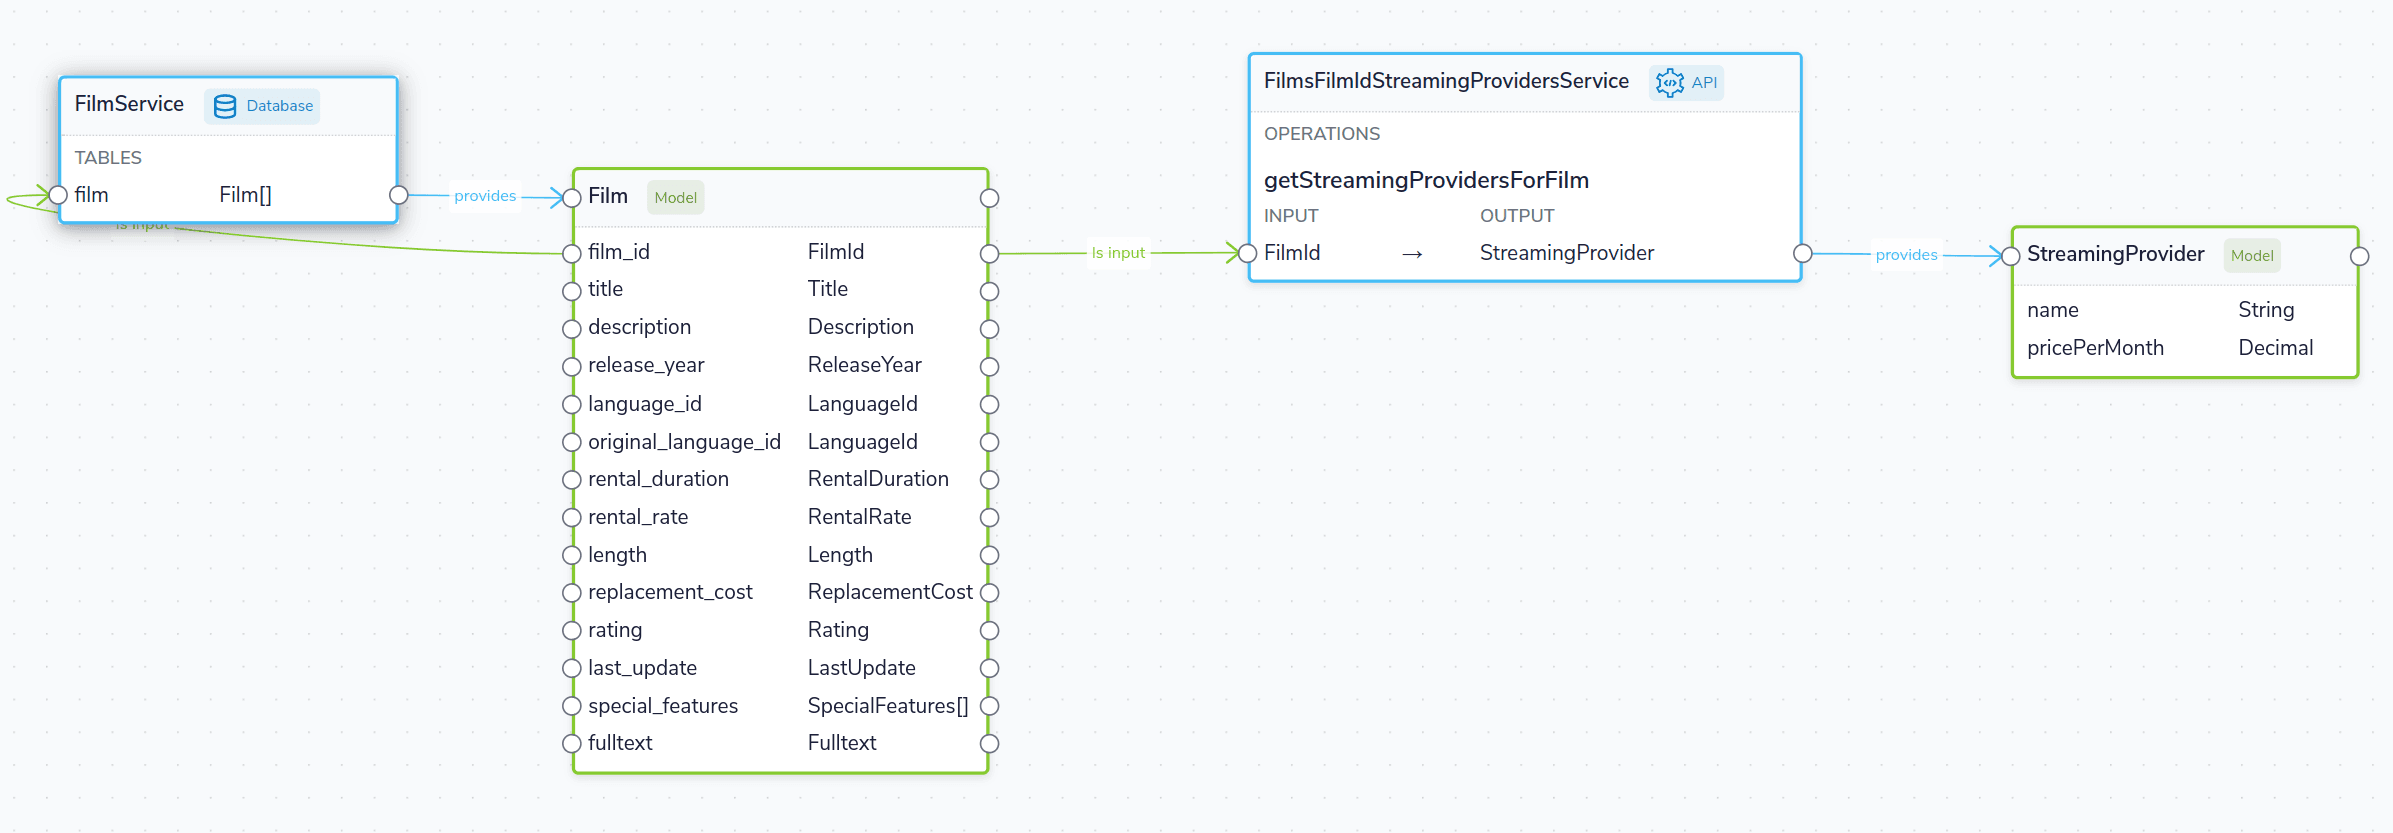
This involves linking Films lists from our Database, with streaming service information from a REST API.
Finally, we’ll listen for updates on a Kafka topic, sending Protobuf messages, and join those with the DB and API.
Here’s what our demo ecosystem looks like:
Prerequisites
- You should have Docker and Docker Compose installed.
Start a local instance of Orbital
For this tutorial, we’re going to deploy Orbital, as well as a few demo projects that we’ll use throughout this tutorial.
Everything you need is packaged up in a Docker Compose file to make getting started easier. To launch, run the following in your command line:
mkdir orbital-films-demo
wget https://github.com/orbitalapi/demos/raw/main/importing-through-ui/docker-compose.yml
docker compose up -d
After about a minute, and Orbital should be available at http://localhost:9022.
To make sure everything is ready to go, head to the Projects Explorer to make sure that some schemas are registered. It should look like the screenshot below. If you see a message saying there’s nothing registered, wait a few moments longer.
You now have Orbital running locally, along with a handful of demo services which we’ll use in our next steps.
If you run docker ps, you should see a collection of docker containers now running.
| Docker Image | Part of Orbital stack or Demo? | Description |
|---|---|---|
| orbitalhq/orbital | Orbital | The core Orbital server, which provides our UI, and runs all our integration for us |
| films-api | Demo | A REST API, which exposes information about films. We also publish a protobuf message to Kafka from here. |
| pagila-db | Demo | A Postgres Db, which contains the Postgres Pagila demo database for a fake DVD rental store |
| confluentinc/cp-zookeeper | Demo (Kafka) | Official zookeeper image, required to run Kafka |
| confluentinc/cp-kafka | Demo (Kafka) | The official Kafka image |
Related links
- Deploying Orbital (without the demo projects)
- Demo project source code (on Github)
Create a project
First, we’ll create a project for Orbital to hold the connection details of our data sources, and schemas. The project is a Taxi project, which gets edited locally, then checked into git once you’re ready to go to production.
- From the sidebar, click Projects
- Click Add Project
- Add a Local Disk project
- For the Project Path, enter
petflix.- The server will tell you it can’t find an existing project, and let you create one - click Create new project
- Enter the package co-ordinates as follows (this is similar to npm, maven, etc.)
| Field | Value |
|---|---|
| Organisation | com.petflix |
| Name | demo |
| Version | 1.0.0 |
- Click Create
A new, empty Taxi project is created, and you’ll be taken to the Project list
Connect a database table
Next, we’ll add a connection to our database, and make a table available as a datasource that Orbital can fetch data from.
This demo ships with an instance of the Postgres demo db called ”Pagila“.
Pagila contains several tables related to running a fictional DVD Rental store, including details of all sorts of different films, actors, etc. We’ll use this database as part of our walk through.
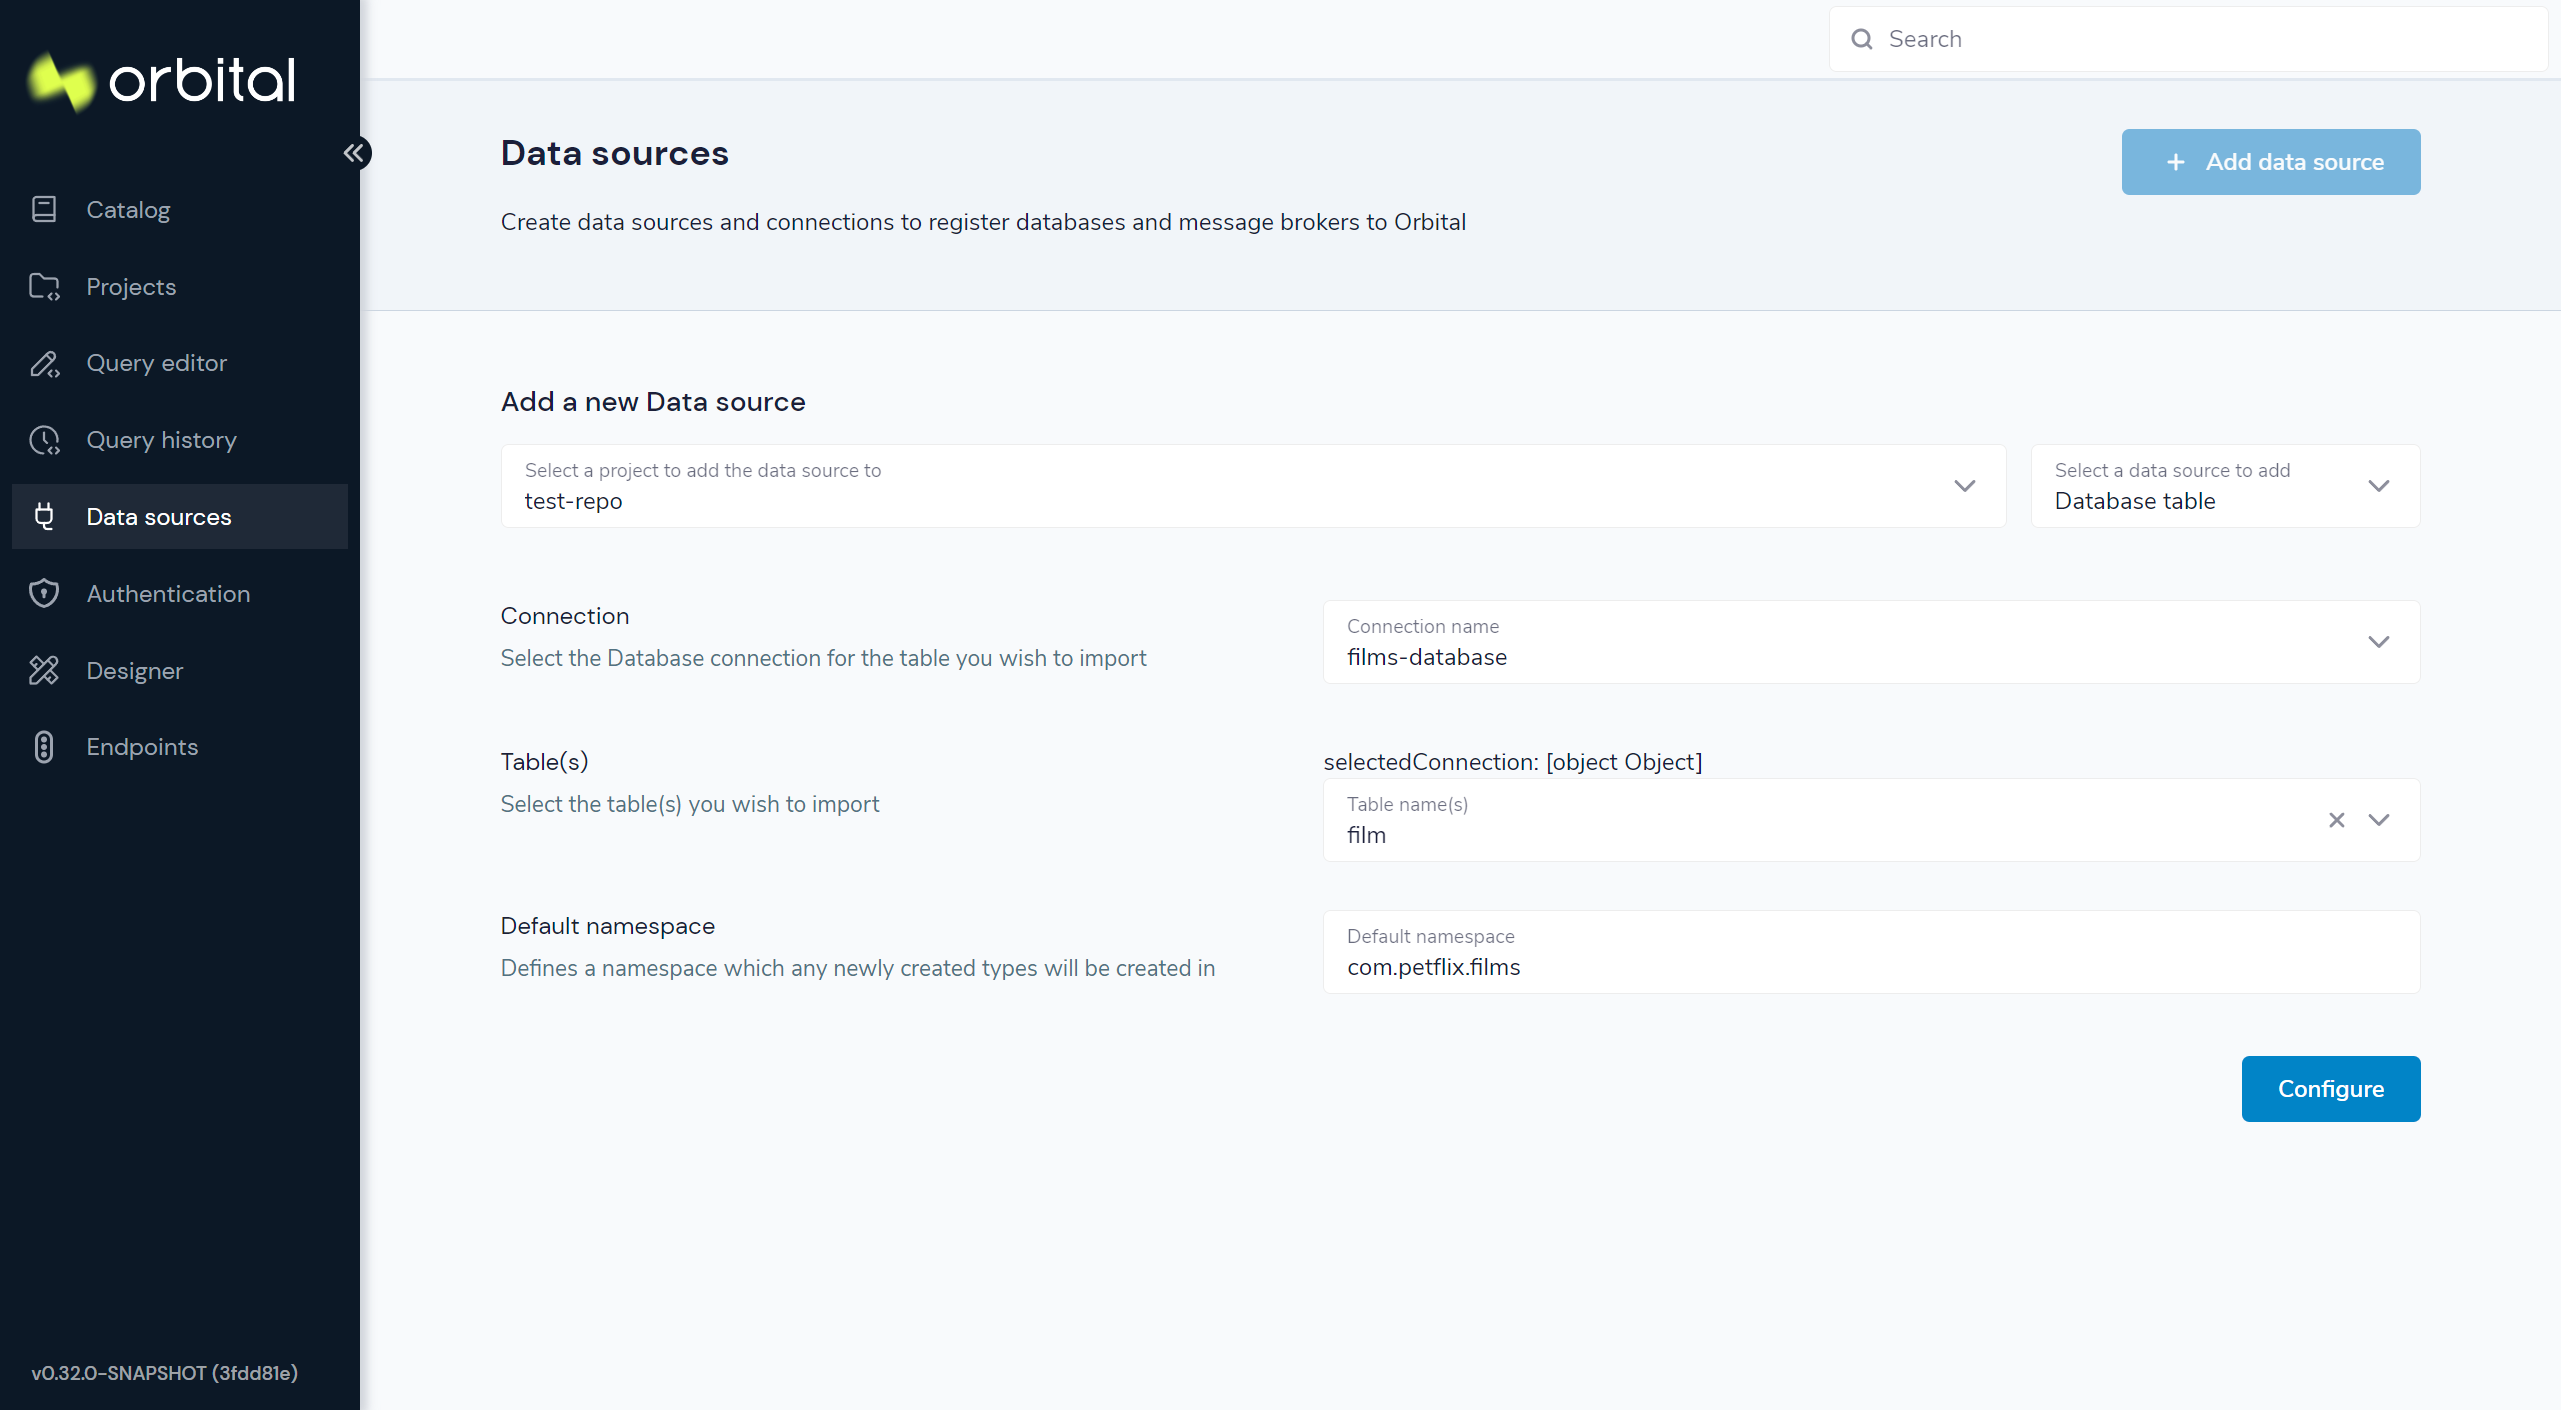
To get started, click on Data sources on the side bar, and click “Add a data source” (or navigate to http://localhost:9022/data-source-manager/add)
Define the database connection
First, we need to tell Orbital how to connect to the database.
- From the project drop-down, select the “Demo” project we just created
- Select “Database Table” as the data source to add
- For Connection, select “Add a new connection…”
- A pop-up window appears, allowing you to create a connection to our database
- Fill in the form with the details below
| Parameter | Value |
|---|---|
| Connection name | films-database |
| Connection type | Postgres |
| Host | pg-pagila |
| Port | 5432 |
| Database | pagila |
| Username | root |
| Password | admin |
- Click “Test connection” and wait for the connection test to be successful.
- Click “Save”.
The connection to the database has now been created, and the pop-up should close.
Select the table to import
Now that Orbital has a connection to the database, we need to select the tables we want to make available for Orbital to query from.
Orbital will create schema files for the contents of the table. Specifically, Orbital will create:
- A model for the table, defining all the fields that are present
- A series of types, which describe the content of each field
- A query service, which lets Orbital run queries against the database
To import the schema:
- Complete the form for the database table to import using the parameters below
| Parameter | Value |
|---|---|
| Connection | films-database (Note - this should already be populated from the previous step) |
| Table | film |
| Default namespace | com.petflix.films |
Namespaces are used to help us group related content together - like packages in Java or namespaces in C# and Typescript.
Here, we’re providing a default namespace, which will be applied to the types, models and services Orbital will create importing this table.
- Click Configure
Orbital will connect to the database, and create all the necessary schema configuration for us for the table.
Preview the imported tables
Orbital now shows a preview of the types, models and services that will be created.
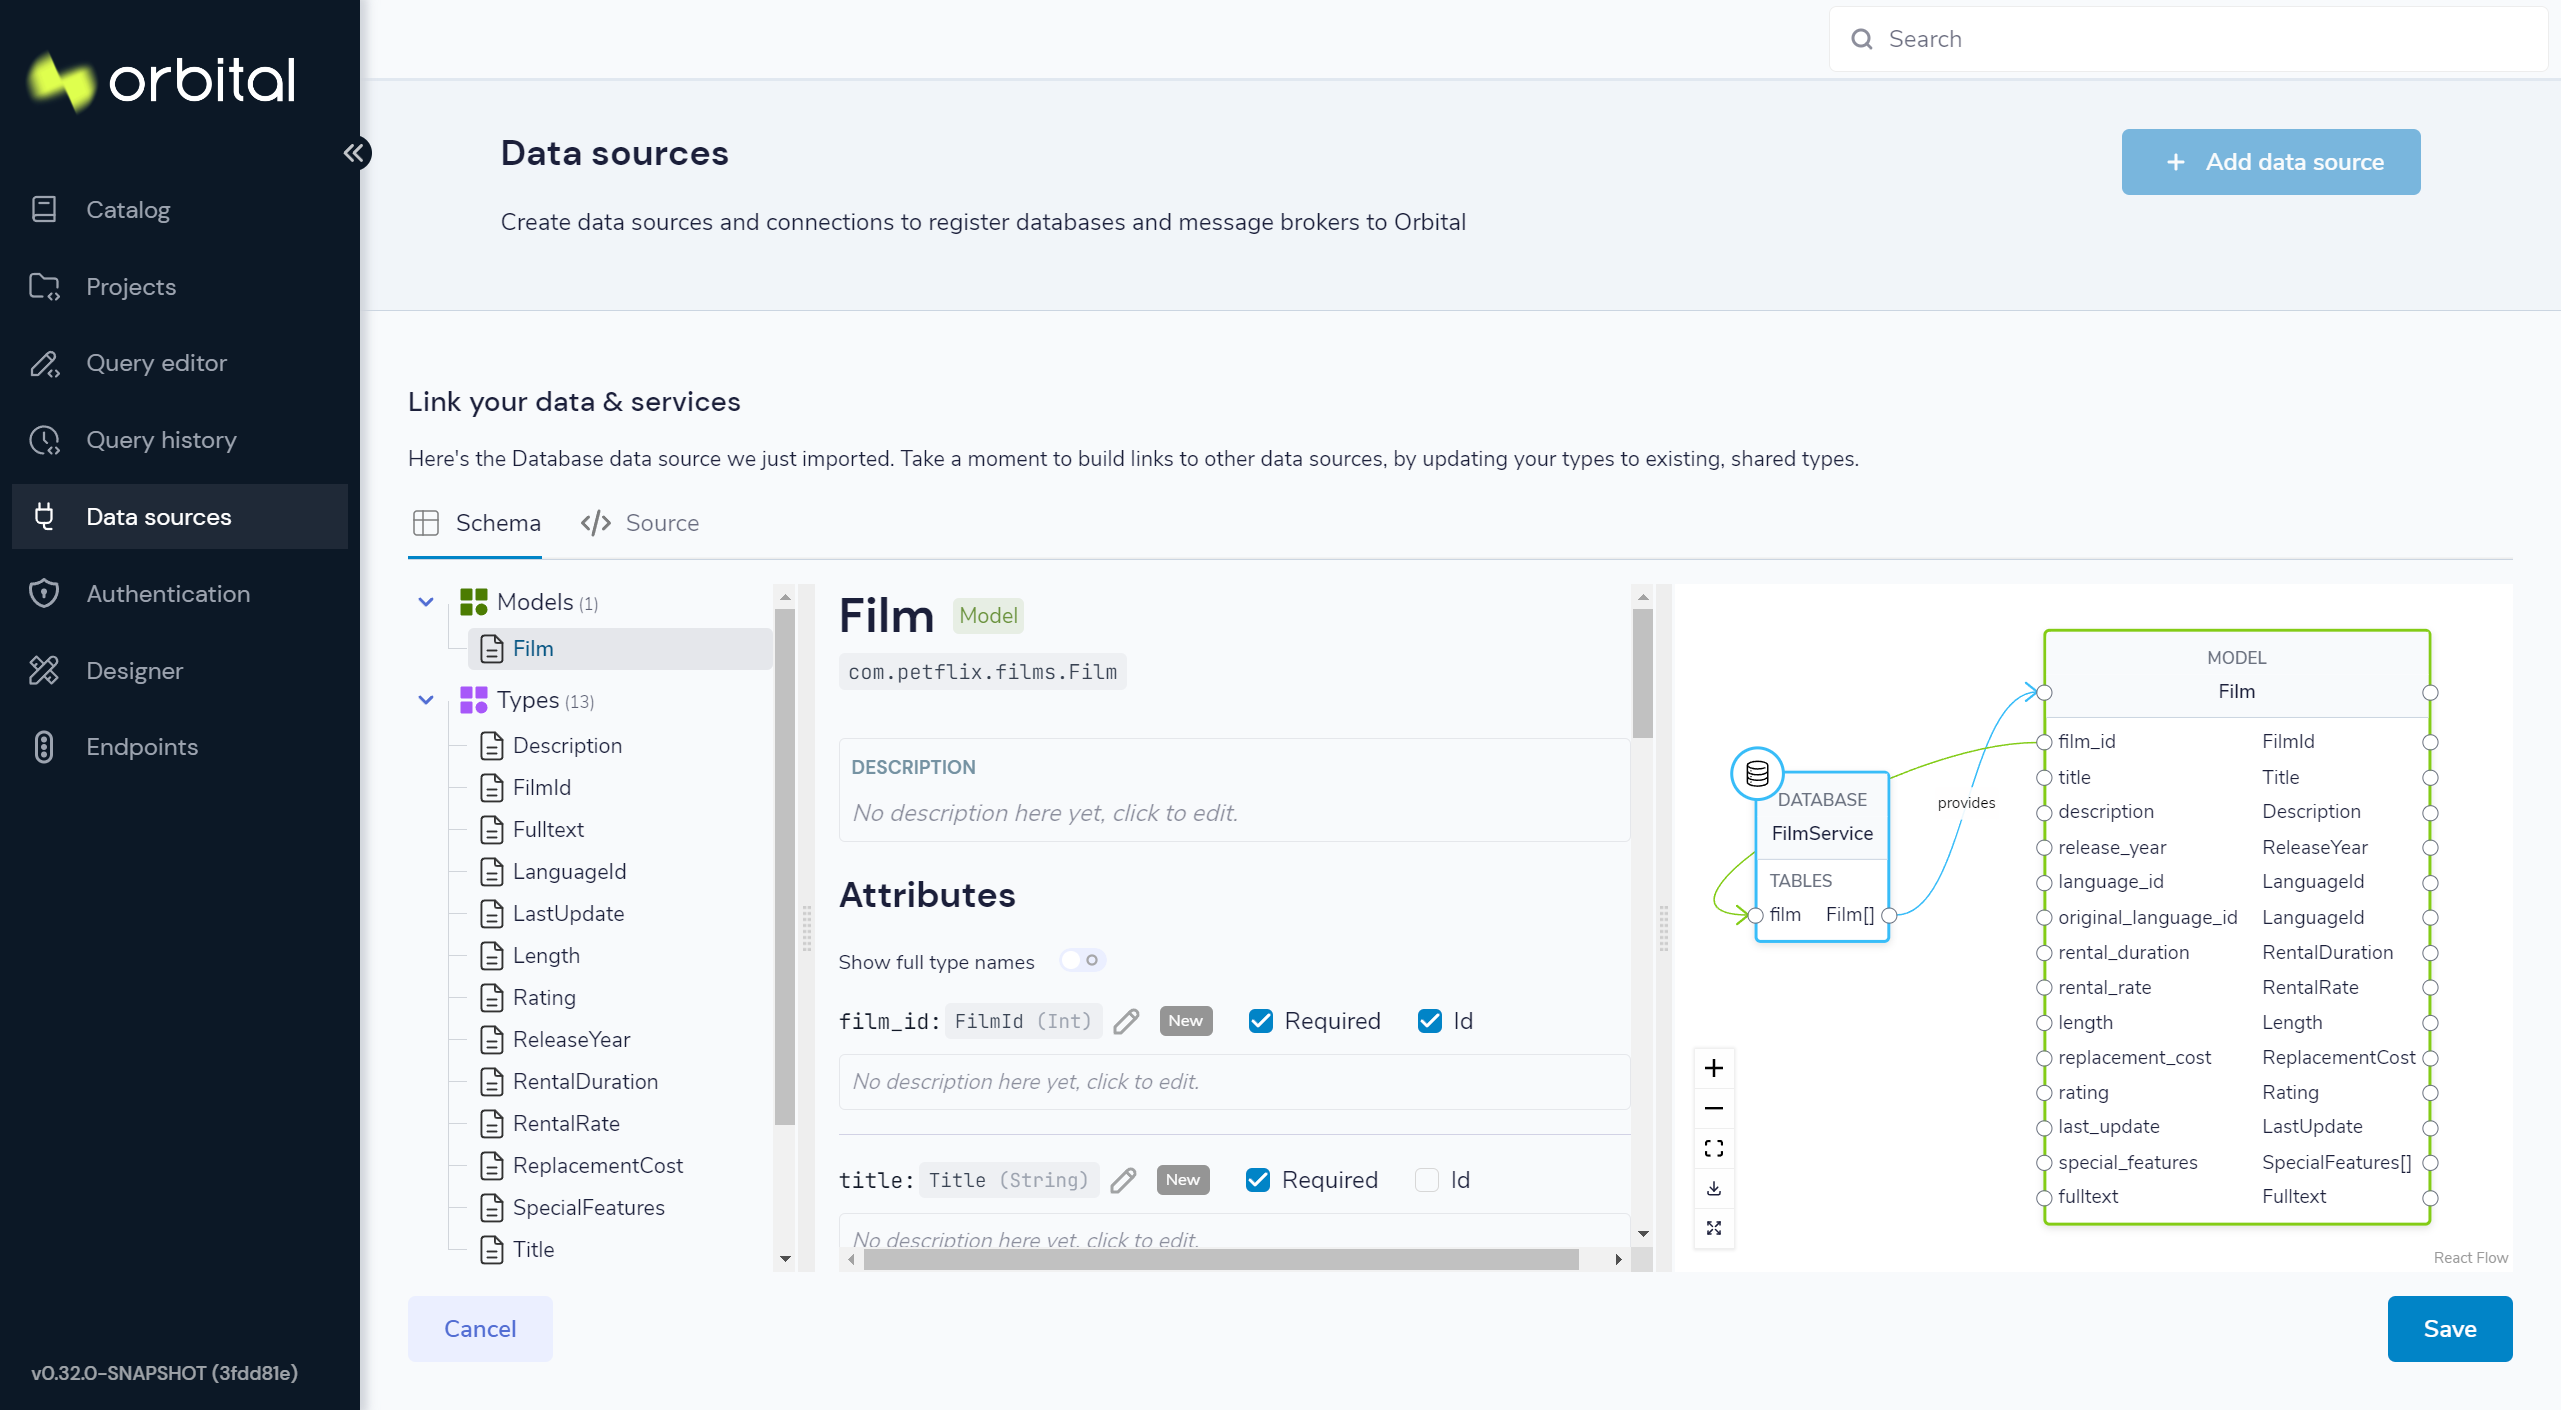
You can click around to explore the different models, types and services that will be created. For now, the defaults that have been assigned are good enough.
- Click Save
Orbital will create the necessary schema files in a local project.
If you're interested...
Orbital has just created a series of Taxi schema files, which contain the schemas
we’ve just imported. You can explore these files locally. If you named your project demo, all the project
files are in a directory called demo next to where you launched Orbital from.
cd demo/
Taxi ships a great VS Code plugin, which provides click-to-navigate, syntax highlighting, autocompletion and more.
You’ve now connected a database to Orbital, and exposed one of its tables, so that Orbital can run queries against it.
Related links
Connect a Swagger API
In this step, we want to tell Orbital about our REST API, which exposes information about which streaming service each of our films are available on.
We’ll use the UI of Orbital to import a Swagger definition of our REST API
- CLick on Data Sources on the sidebar
- Once again, click “Add a data source”
- Alternatively, navigate to http://localhost:9022/data-source-manager/add
- Select the demo project as the target project
- From the drop-down list, select “Swagger / Open API” as the type of schema to import
- For the Swagger Source, select a Url.
Fill in the form with the following values:
| Parameter | Value |
|---|---|
| Swagger source | http://films-api/v3/api-docs |
| Default namespace | com.petflix.listings |
| Base url | Leave this blank |
- Click Configure
Update the service type
A preview of the imported schema is once again displayed.
This time, we do need to modify some default values.
Click on Services → getStreamingProvidersForFilm.
This shows the API operation that’s exposed in the swagger spec we just imported. This API accepts the id of a Film, and returns information about the streaming services that have the film available to watch.
Now, take a look at the parameters section.
Note that the input parameter - filmId is typed as Int. Since we know that this is a FilmId - the same value that’s exposed
by the Films database table. We need to update the type accordingly, so that Orbital knows these two pieces of information are linked.
- Click on the
Intlink - In the search box, type
FilmId - Select the FilmId type that’s shown
- Finally, click Save
Great! We’ve now exposed the Swagger API to Orbital
What just happened?
We’ve connected the Swagger schema of a REST API to Orbital. Orbital now knows about this service, and will make calls to it as needed.
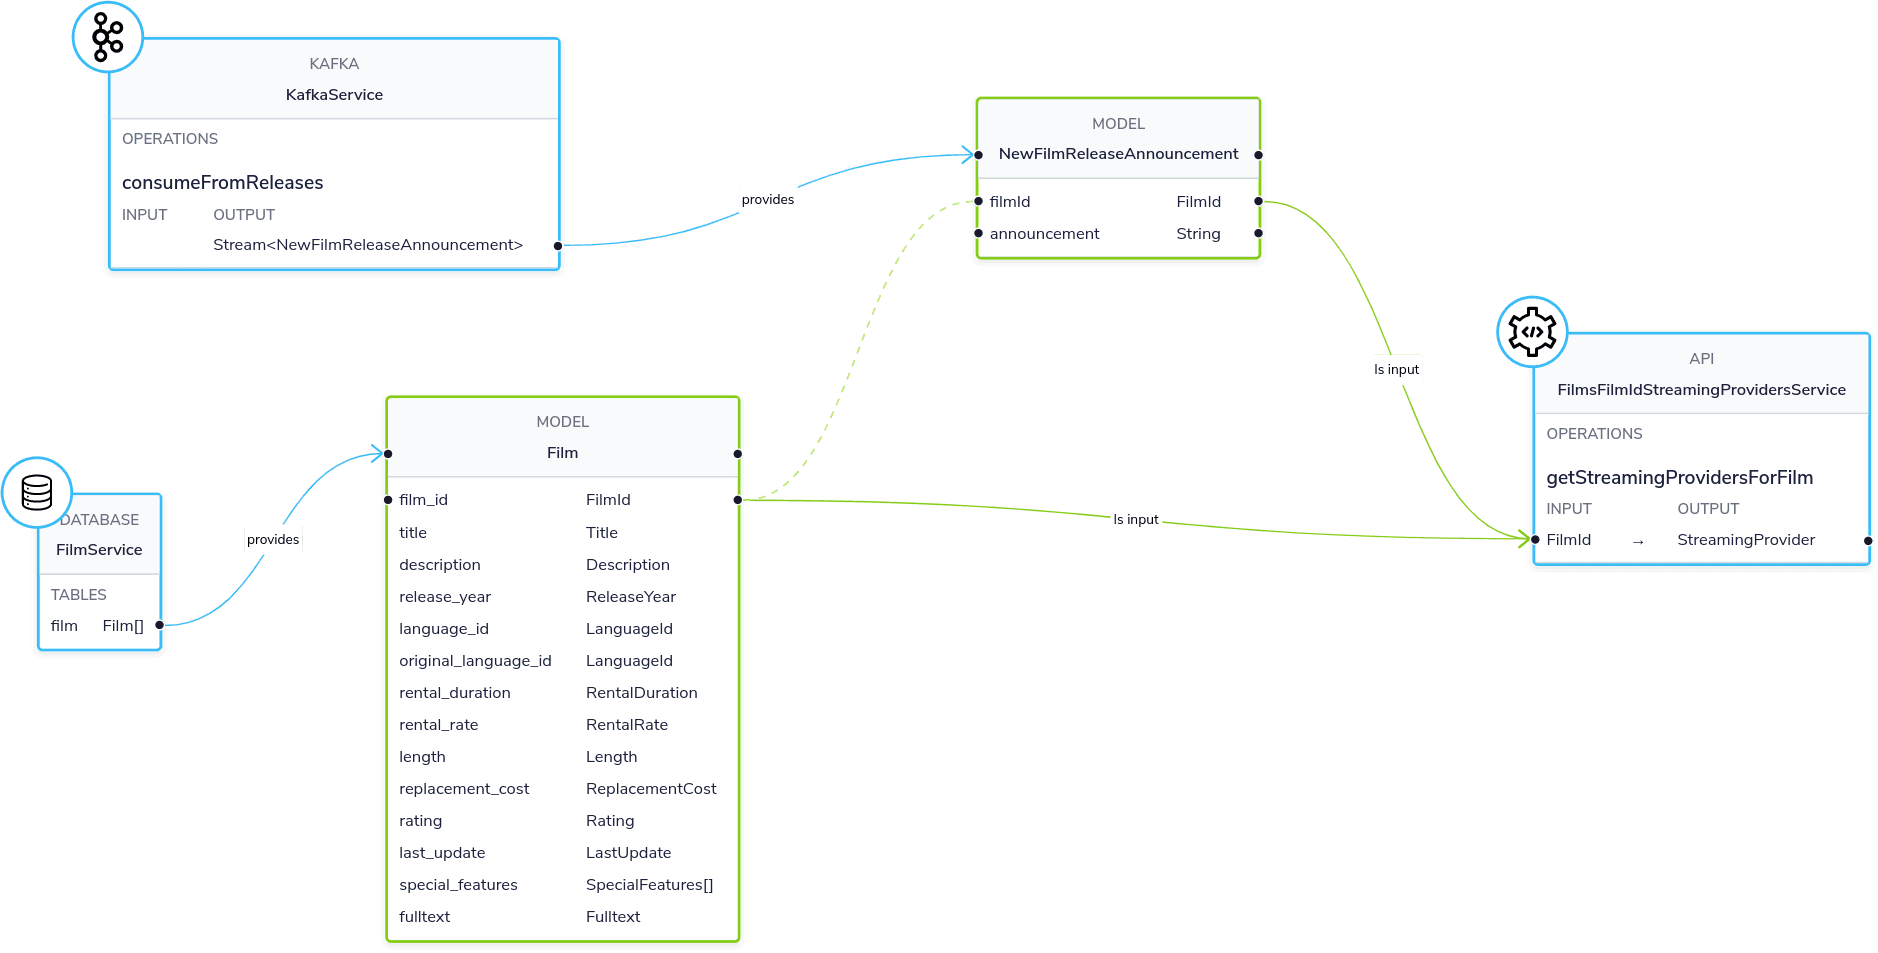
Importantly, we’ve defined a link from the data in our Database to the data in the Rest API. The schema diagram shows a good outline of this relationship:
Integrating services & loading data
Now that everything is set up, let’s fetch and integrate some data.
List all the films in the database
Queries in Orbital are written in TaxiQL. TaxiQL is a simple query language that isn’t tied to one specific underlying technology (i.e., it’s independent of databases, APIs, etc.).
This means we can write queries for data without worrying where the data is served from.
Our first query is very simple - it just finds all the films.
- Head over to the Query Builder, and select the Query Editor tab (or navigate to http://localhost:9022/query/editor)
- Paste in the below query:
find { Film[] }- Click run.
This query tells asks Orbital for all Film records.
When this query is executed, Orbital looks for services that expose a collection of Films, and invokes them.
In our example, that means that Orbital will query the database to select all available films.
There are different options to show the result of Orbital queries. These are displayed as tabs under the query editor.
- Table - Nice for tabular, two-dimensional data
- Tree - Nice for nested data
- Raw - Raw json - great for larger result sets
- Profile - What work did Orbital to produce the result. Contains information about the systems called by Orbital, performance stats and lineage information.
Once the query is completed, you should see a list of records displayed in the grid.

Transform the data
Orbital lets you restructure data in a way that’s useful to you. Our original query returned the data as a flat list, since it’s coming from a database.
However, for our purposes, (let’s say we’re building a UI), we might want to restructure the data to a subset of fields, grouped in a way that’s useful.
- Paste the below query into the Query Editor.
find { Film[] } as {
    film: {
        name: Title
        id : FilmId
        description: Description
    }
    productionDetails: {
        released: ReleaseYear
    }
}[]- Click Run
This time, the data has been returned structured as a tree. To see the tree data, click on the Tree tab in the results panel.
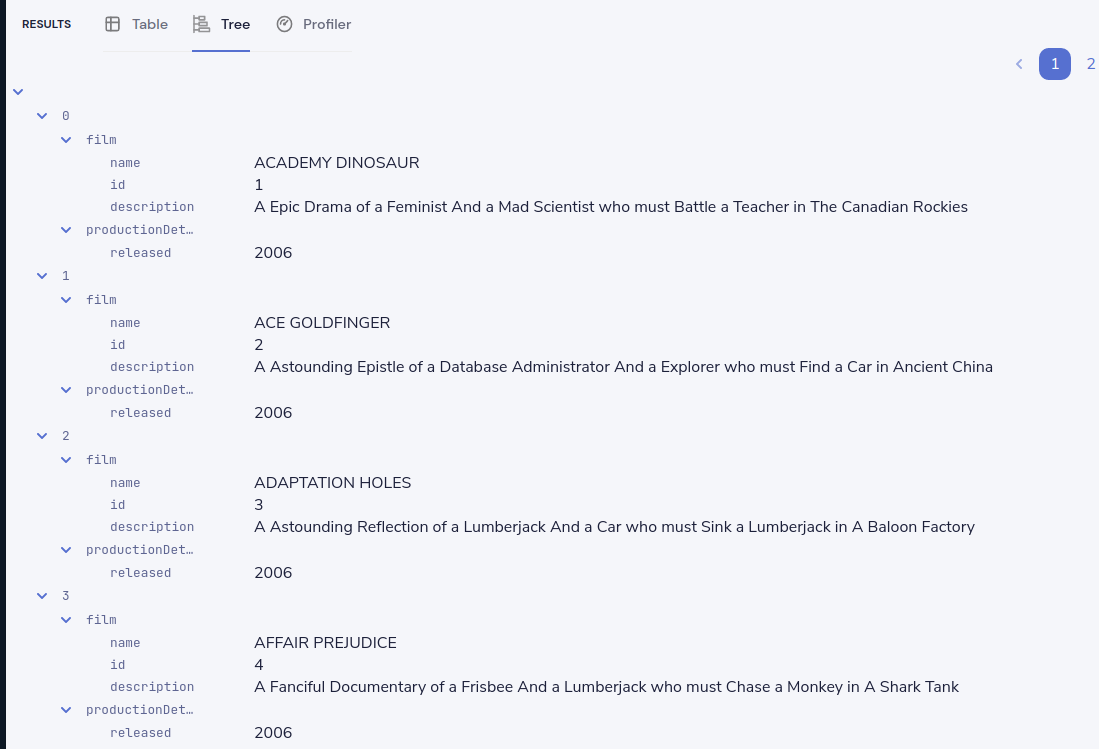
Now our data has been restructured into a tree shape. Using this approach, we can change the shape of the structure, along with field names.
In Taxi language, this is called a projection - as we’re changing the shape of the output.
Combine data from our DB and Rest API
Finally, let’s add in data about which streaming movie service contains each movie. This requires linking data between our database and our REST API.
As Orbital is handling all the integration for us, this is as simple as updating our query to include the provider data.
Orbital handles working out how to call the REST API, which data to pass, and what to collect.
- Paste the below query
find { Film[] } as {
    film: {
        name: Title
        id : FilmId
        description: Description
    }
    productionDetails: {
        released: ReleaseYear
    }
    providers: StreamingProvider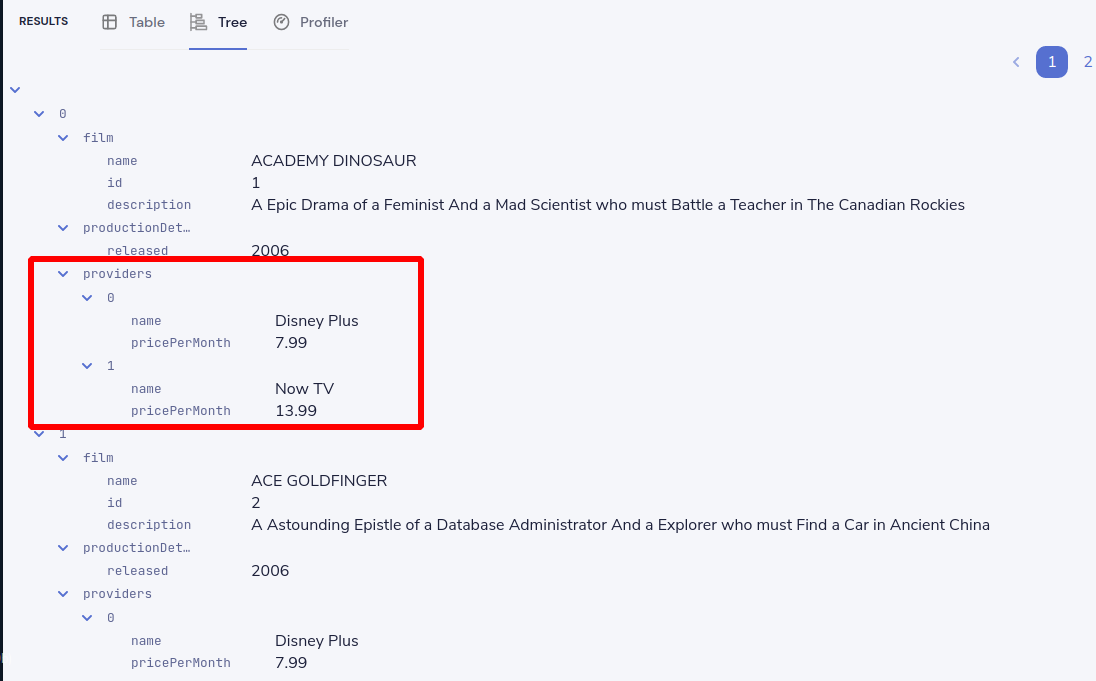
}[]- Click Run
When the query results are returned, as this is nested data, ensure you’re in the Tree view to see the results. Note that now we have data from our database, combined with data from our Rest API.
Exploring the query execution
Orbital has several diagnostic tools to help us see what happened.
Exploring the query execution plan
In the Profiler, you can click to see the high level integration plan that Orbital used to execute the query, showing the services that were called, and how data was resolved at a field level.

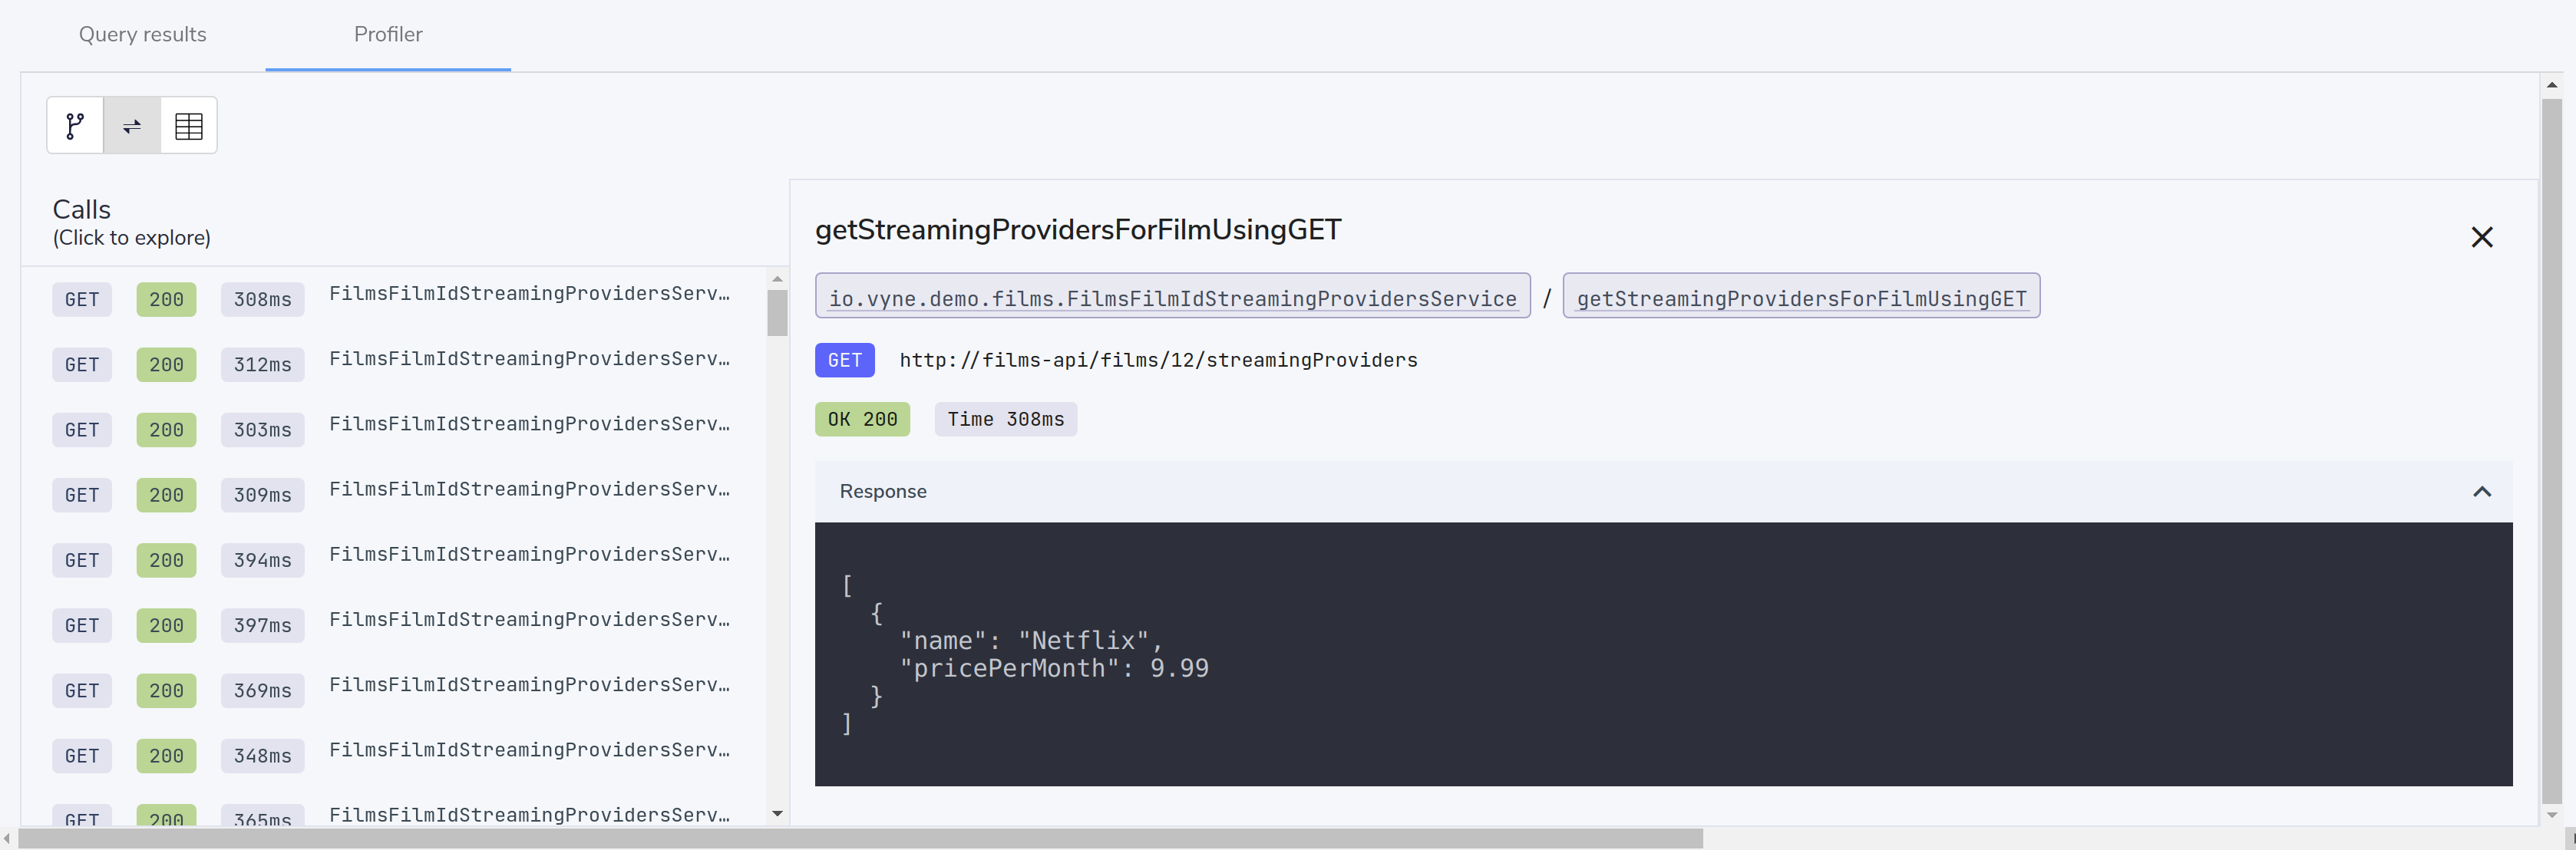
Explore the individual server requests
In the Profiler, you can click to see a sequence diagram of calls that have taken place to different services. Clicking on any of the rows shows the actual request and response.
Exploring cell-based lineage
Orbital provides detailed trace lineage for each value shown in its results.
In tree mode, try clicking on one of the names of the streaming providers. A lineage display will open, showing the trace of how the value was derived.
- We can see that a value of Netflix was returned from an Http operation.
- The input to that Http operation was a FilmId - in our example, the value 1.
- Clicking on the FilmId expands the lineage graph to show where that FilmId came from.
- We can see that the FilmId was returned as the result of a database query.
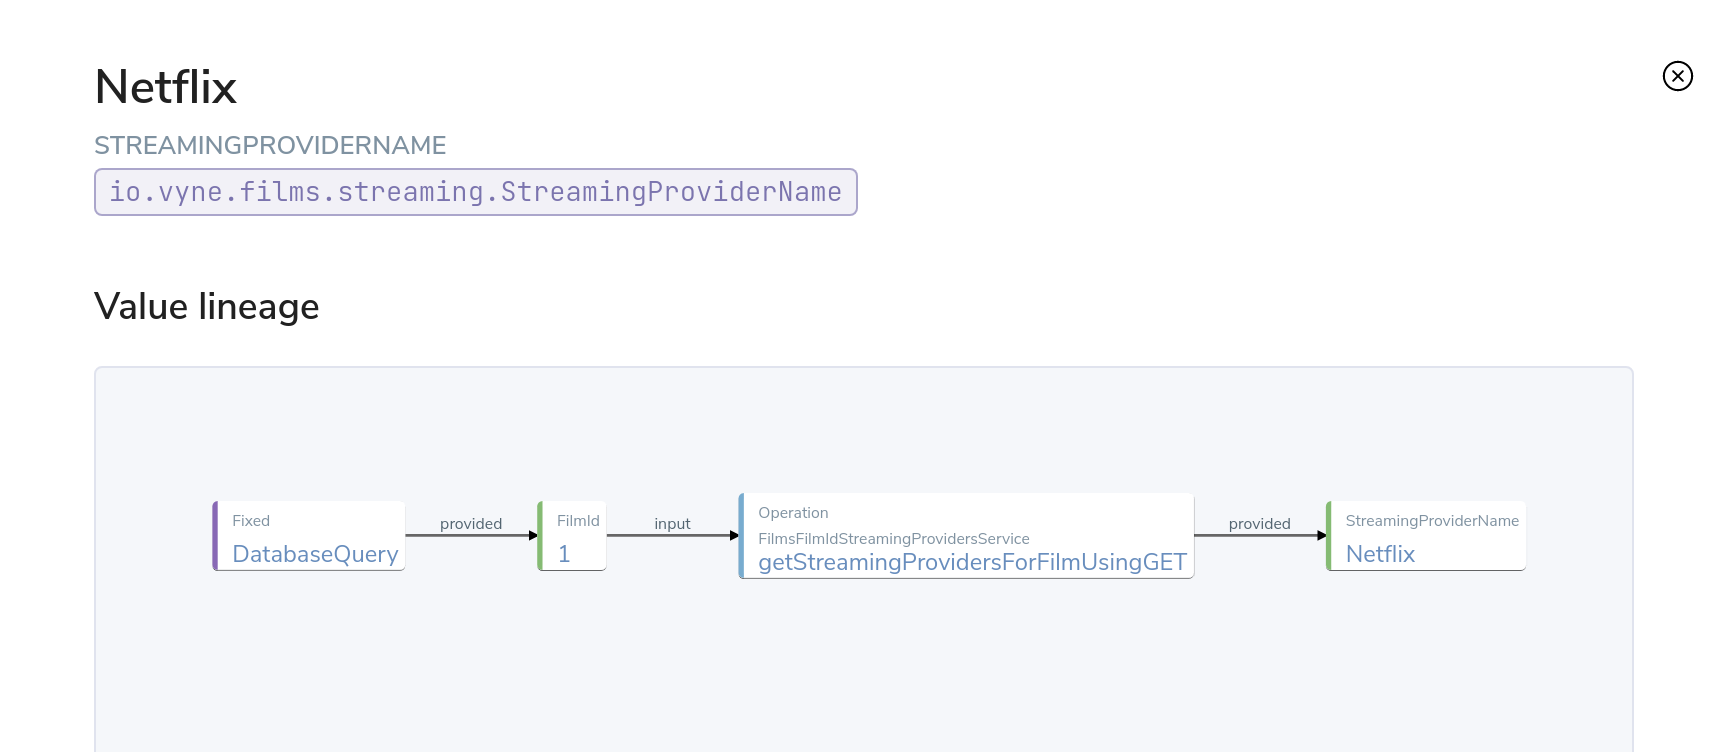
This deep lineage is very powerful for understanding how data has flowed, and proving the provenance of data that Orbital is exposing.
Running our query via CURL
Although Orbital’s UI is powerful, developers will want to interact with Orbital through its API. That’s a topic on its own, but here is an example of running the same query through Orbital’s API, using curl.
Getting a JSON payload
We can use Curl to get the results of our query as a JSON document.
- Copy and paste the below snippet into a shell window, and press enter
curl 'http://localhost:9022/api/taxiql' \
  -H 'Accept: text/event-stream;charset-UTF-8' \
  -H 'Content-Type: application/taxiql' \
  --data-raw 'find { Film[] } as {
    film: {
        name: Title
        id : FilmId
        description: Description
    }
    productionDetails: {
        released: ReleaseYear
    }
    providers: StreamingProvider
}[]'
Streaming versus Batch results
The cURL command streams results from Orbital as soon as they’re available.
That’s because we set the Accept header to text/event-stream.
This is both fast, and more efficient for Orbital, as it’s not holding results in memory - allowing Orbital to work on arbitrarily large datasets.
If you’d rather have the results as a single batch, change the Accept header to -H 'Accept: application/json'
Related links
Adding a Kafka streaming source
Now that we have Orbital linking our Database and REST API, it’s time we add a Kafka stream into the mix.
We have a new releases topic that emits a message whenever Netflix decides to turn a beloved movie into a new TV series.
For this part of our demo, we’ll use Orbital to listen for new release announcements, and join data from our REST API and Postgres DB.
Import a Protobuf schema
Our new releases topic emits a protobuf message - which Orbital needs to know about.
To keep things simple in our demo, the protobuf message is available via one of our APIs. You can view the protobuf yourself by clicking on http://localhost:9981/proto.
For Orbital (running inside the Docker Compose network), this is visible as http://films-api/proto.
Import the spec by clicking “Add a data source” on the front page of Orbital, or by navigating to http://localhost:9022/data-source-manager/add.
- Select “Protobuf” as the type of schema to import
- Set the Protobuf Source as a URL
- Paste the url:
http://films-api/proto - Click Configure
You should see a preview of a newly created a model: NewFilmReleaseAnnouncement.
We need to indicate that the filmId property is the same as the FilmId used elsewhere in our company.
- On the left-hand table, click Models → NewFilmReleaseAnnouncement
- The NewFilmReleaseAnnouncement data model is displayed
- In the “Attributes” table, click on the underlined
Integertype next to filmId - Search for the type FilmId, and select
film.types.FilmIdfrom the search box
The announcement field has been typed as Announcement. As there’s no existing types in our company for this data,
it’s fine to leave as-is, and use the newly created tye.
We’ve now imported a protobuf schema, and linked its fields to other fields in our schema.
Import a Kafka Topic
Next we need to tell Orbital about the Kafka topic.
- Return to the Orbital home page by clicking the Orbital logo in the nav bar.
- Click Add a Data Source, or navigate to http://localhost:9022/data-source-manager/add
- From the drop-down, select Kafka Topic
- In the Connection Name, select “Add a new connection…”
Fill out the form with the following details:
| Parameter | Value |
|---|---|
| Connection name | my-kafka |
| Connection type | kafka (should already be populated) |
| Broker address | kafka:29092 |
| Group Id | vyne (should already be populated) |
- Click create. A new Kafka connection is created, and the popup should close
Fill out the rest of the form with the following details:
| Parameter | Value |
|---|---|
| Connection name | my-kafka (should have been populated when the pop-up closed) |
| Topic | releases |
| Topic Offset | LATEST |
| Namespace | com.petflix.announcements |
| Message Type | NewFilmReleaseAnnouncement |
| Service and Operation Name | Leave these blank |
- Click Configure
A preview of the schema is shown.
By clicking Services → MyKafkaService → consumeFromReleases, you can see
a new operation has been created which returns a Stream<NewFilmReleaseAnnouncement>.
Streams are a different type of operation - rather than request / response like an HTTP operation exposes, these expose a continuous stream of data.
Take a look around, and then click Save.
Join data from Kafka, API and our DB
It’s time to explore writing some queries that join data from across all 3 sources.
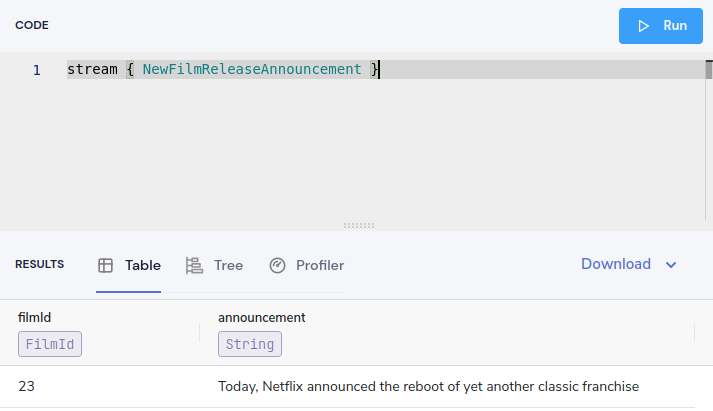
First, let’s start with querying our Kafka topic. Head over to the Query Editor, and paste the following query:
stream { NewFilmReleaseAnnouncement }You should see results streaming in, which are being published to our Kafka topic.
Now, let’s enrich our Kafka stream with data from our other sources.
Cancel the running query, and paste the following:
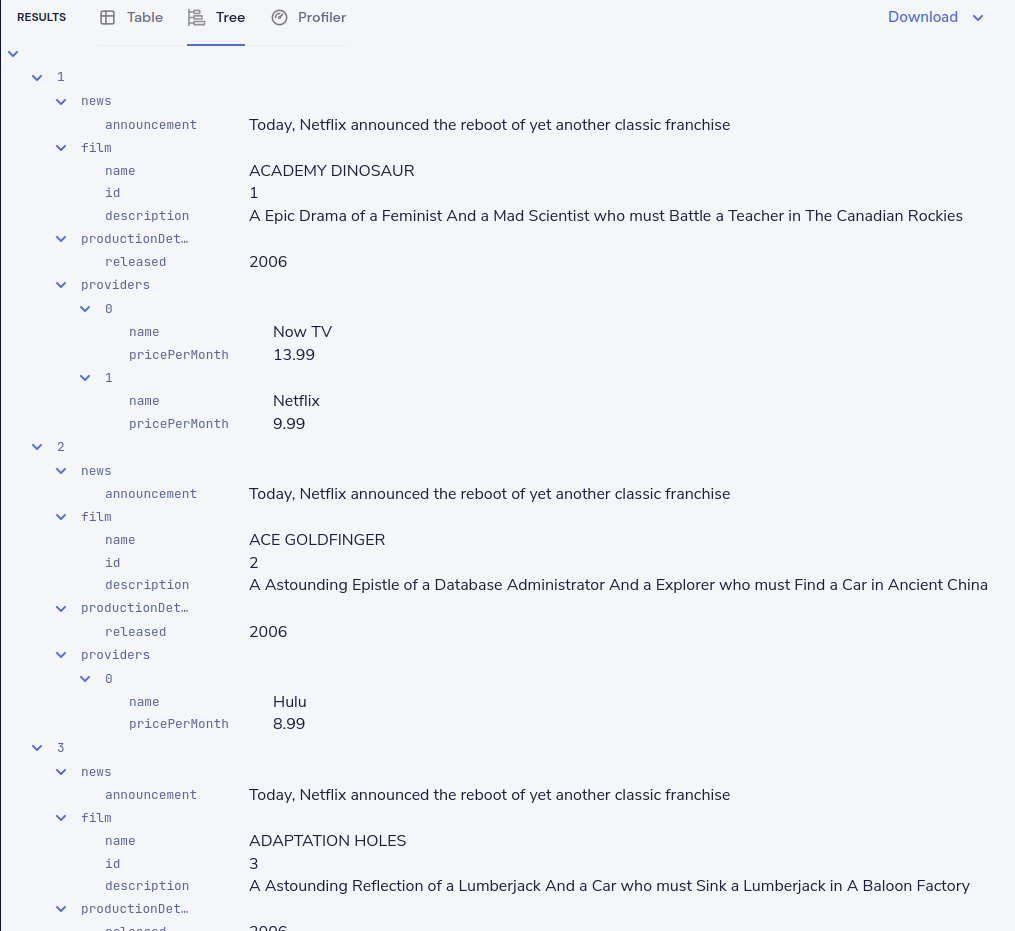
stream { NewFilmReleaseAnnouncement } as {
    // The announcement comes from our Kafka Protobuf message
    news: {
        announcement: NewFilmReleaseAnnouncement
    }
    // Grab some film information from the Database
    film: {
        name: Title
        id : FilmId
        description: Description
    }
    productionDetails: {
        released: ReleaseYear
    }
    // And query the REST API to see where we can watch this
    providers: StreamingProvider
}[]
In the results panel, you should see the following:
Looking in the Profiler tab, you can see the updated integration plan:
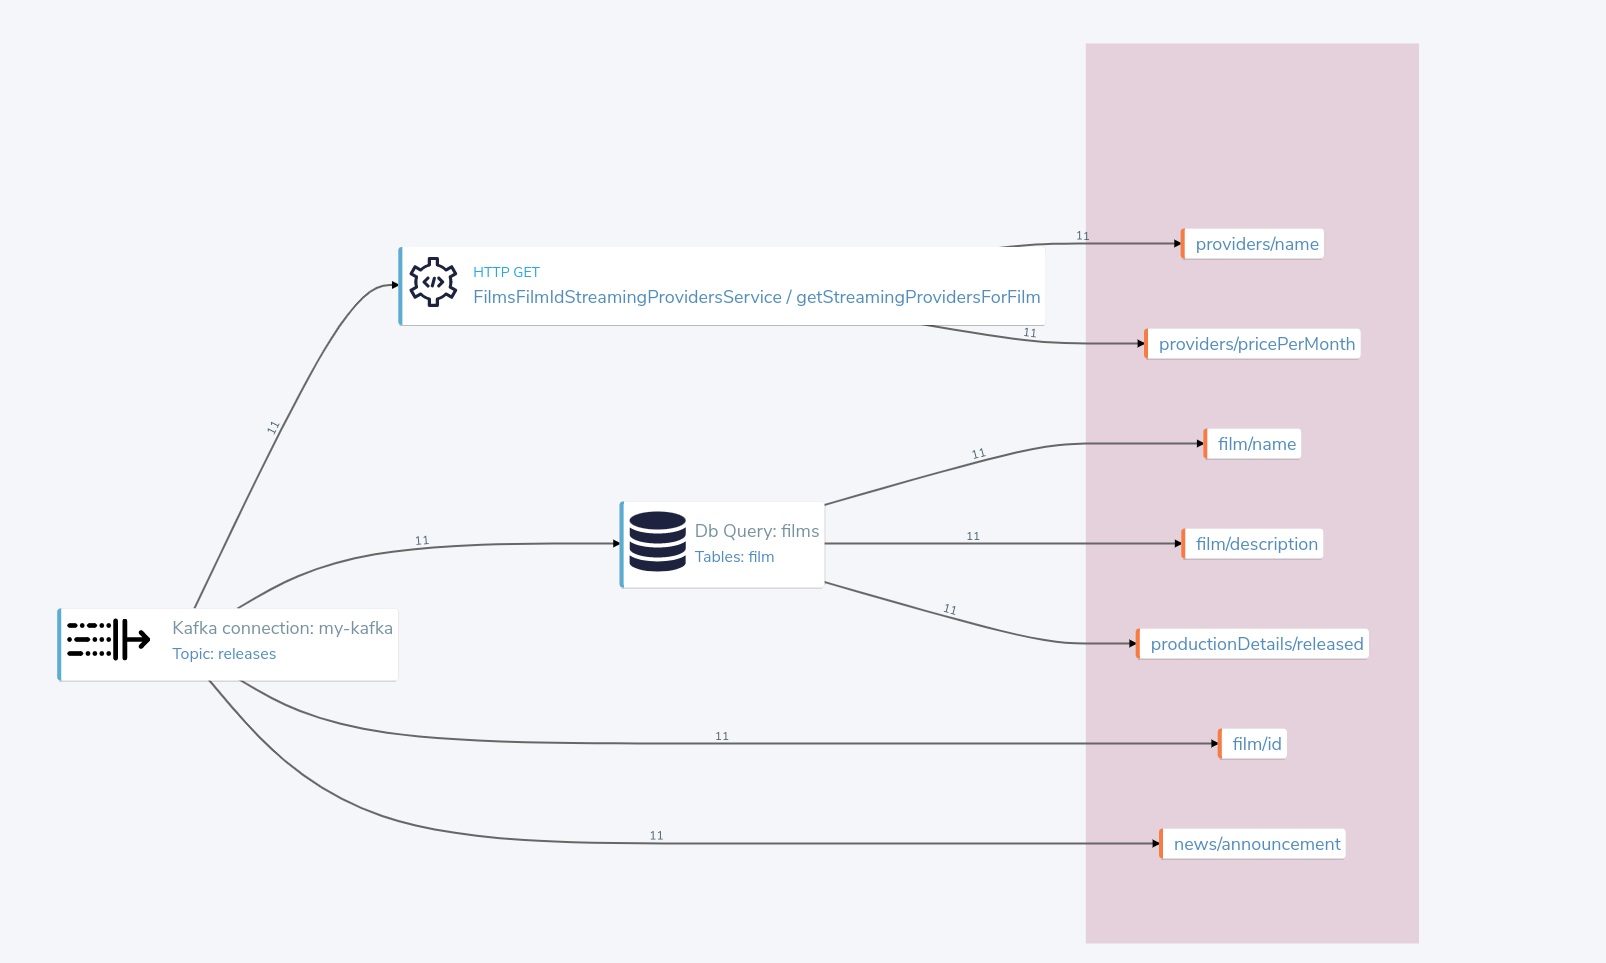
What just happened?
- Orbital read our protobuf message from the Kafka topic
- Enriched it with data from a Database query
- Then fleshed it out some more information from a REST API call
- And served it up in our UI.
What's next?
In this tutorial, we’ve set up Orbital, and used it to automatically integrate data from a Postgres Database, a REST API, and a Kafka topic with protobuf. Nice stuff!
Look under the hood
In order to get a better understanding of what’s happened under the hood, take a look at some of the files that Orbital has generated during this tutorial.
| Directory | What’s there? |
|---|---|
workspace.conf | The config file that lists all the projects - including the one we created. It defines where to read and write the schema files Orbital created in the background. |
demo/ | The schema project that Orbital was writing schemas to. |
demo/taxi.conf | The taxi.conf file that describes the project we just created. This is similar to a pom.xml for Maven, or package.json for npm |
demo/orbital/connections.conf | A connections file defining the database and Kafka connections you imported in the UI. |